Search Fancy-free Crafts Blog

Friday, October 30, 2015

Concerning the construction of three lady's bonnets and night caps

As part of my Halloween maniac episode, I decided to sew a cap to go with my historically inaccurate night dress. I decided on something clinical looking, clean and simple. I found several blogs where people traded tips and patterns on bonnets. Turns out ladies back in the day had a cap for every occasion, including sleeping.

Well then, "logically" a lady escaping from a lunatic asylum in the night would wear a sleeping cap. (We have standards here. Also, totally logical scenario, I know). To the Google to find a sleeping cap!

Several bloggers (Hoopskirts, et al) had posted links to one specific sleeping cap originally published in Peterson's Magazine. They shared pictures of their completed caps, but there were no instructions or printable patterns. I found another cute cap as well.

I tested the original instructions for three caps and I share with you the patterns and results.

Peterson's Magazine Night Cap, July 1859

Ultimately, this was the bonnet that was successful and that I selected for my costume.

Here's a side by side comparison of the magazine's illustration and my completed cap.


Here is the full illustration from the magazine:

Using the original measurements I imported the plate and made a pattern. The test cap was too shallow and tight fitting, so I lengthened the brim, and both widened and lengthened the crown. My My head circumference is 24 inches. Below is how the original pattern fit, which would work well for a teenager or a more petite woman. 


Peterson's Magazine Night Cap, 1859

To be honest, I didn't record what issue this night cap was from, but it was also from 1859. This one had no helpful pattern diagram or dimensions, just illustrations. Here is the original magazine illustration:


I imported the picture and drew a rough pattern over top, using the flattened cap drawing as a guide. My test pattern was much too small, but I believe I have copied the general style and construction quite well!


Grandma's advice was "measure a shower cap for the right dimensions". My shower cap's diameter came out to 20 inches, while my test cap's diameter was roughly 16 inches. I have enlarged this version of the pattern to 20 inches, but I can't guarantee how it will fit.


Pattern

These are my draft instructions:
  • Cut out the large circle and trace onto the wrong side of your fabric. Cut out fabric piece.
  • Cut out the the half circle drawstring channel from the pattern. Trace onto the wrong side of your fabric, cut out second piece.
  • Using the large circle pattern as a guide, mark a one inch line for your button hole at the back of the round cap piece. Sew a 1 inch long button hole, Trim open.
  • Pin the half circle drawstring channel onto the wrong side of the cap piece. Sew along both the curved top and bottom edges of the drawstring channel, leaving both narrow ends open. Thread a drawstring through one end and out through the button hole. Repeat for the other side. Sew the end of the channel closed, securing both drawstrings.
  • Gather the back of the cap and tie a tight bow.
  • Using a loose basting stitch, gather the sides and front of the cap according to your preference. Sew over the basting stitch with a straight machine stitch to secure the gathers. 
  • Attach the two large ties at the back of the cap. Tie in a large bow over the brim. The large, decorative ties will hide the gathering stitch, just hand sew in place to secure bow. 

The Workwoman's Guide 1838, bonnet

To be honest, this one was a total disaster. I tried to recreate this pattern from The Workwoman's Guide. (Clicking on the plate below will take you to the correct page in Google Books.) 

This cap was difficult to make as the instructions seemed to be missing a few key steps.


FYI, a "nail" is a unit of measurement. One nail equals 2.25 inches.

I know you can't make a cap out of an old T-shirt and hemp string and still expect great results...but this cap was just awkward. The crown was square and floppy, the side flaps too long. Why does the design call for a bow on the top of the head? Grandma thought it was a Dutch cap. Aah well, it was only a test. 


For the life of me, I can't seem to find my pattern. I'll upload if I find it on one of my plethora of USB keys.

Here are the draft instructions I wrote down while sewing, but if you have any better suggestions, be sure to leave them in the comments!
  • Fold the crown seam down 1/2 in., hem.
  • Fold along the side marks for drawstring, wrong sides together. Top stitch 1/4 in. French seam the fold to create a drawstring casing.
  • Sew crown wrong sides together as close to the edge as possible. Don't sew the drawstring casings shut, leave open.
  • Run ribbon through casings. Leave enough to tie a bow at the crown. Sew bottom of casings closed, securing ribbons. Trim ribbon flush with bottom edge.
  • Cut slit from C to F. Fold down hem and sew 1/2 in. drawstring casing along bottom edge and up into crown. Fold corner to ensure continuous channel. Thread ribbon along side and up and out at back of head. Sew ribbon in front seam to secure. Trim.
  • Finish all remaining hems.

Wednesday, October 28, 2015

The unsubtle knife: Halloween costume murder weapon

I used a blunt Japanese stainless steel letter opener to create this horrific fake bloody dagger.


Step 1: I gently sanded the handle and used a chalky-finish brown acrylic paint to distress the handle.


Step 2: I wrapped hemp rope around the handle of the letter opener and secured using a hot glue gun.

Step 3: To age the handle, I took a very fine brush, dipped the tip in brown acrylic paint and wiggled it into the grooves between the rope windings. It gave the handle more depth and dimension. I tried using my finger to rub paint over top of the string, but it just looked flat and dirty.

Step 4: I mixed together some deep (blue-based) red paint and burnt sienna (brown) to create a partially realistic blood colour. I mixed the paint in a deep disposable lid and covered it in plastic wrap between applications to keep the paint from drying out. I added equal parts water to paint for a pigmented, yet liquid paint application. I held the knife by the handle, with the the tip resting on the table. I slowly dripped paint onto the blade using a brush and let it run down to the tip for a streaked look. 


Step 5: I let the blood dry between layers and repeated this process for the other side of the blade. 

Step 6: I applied two coats of matte acrylic sealer on both the blade and handle to prevent the paint from bleeding. (Hah, I murdered that pun).

Happy scaring! 

Halloween mania

I will be posting a series of tutorial this month as I make my Halloween costume.

Tada, here's the finished look!
The "Lady in White"
I was inspired by some British gothic novels, primarily "Jane Eyre" and "The Lady in White". I decided I would be an "escaped, murderous asylum patient." I haven't decided if I'll be alive or dead - I'm favoring the ghostly apparition option.

I was quite please with the cost, I managed to thrift the supplies for under $15. I found a cream bedsheet with a large lace ruffle that I transformed into a nightgown and a cap. I used a plain Japanese letter opener to make a bloody murder weapon and some dollar store Halloween decorations served as the chains.

I researched Regency and American Pre-Civil War era clothing for this costume. Here's a few tips on the correct terminology of clothing from those eras - finding patterns and examples are difficult if you don't know the right search terms. From what I can tell, the people posting about historical clothing tend to be costumers, historians or historical re-en-actors and they use the original terms.

A nightgown, slip or nightdress was typically called a "chemise" or "shift". A bonnet was for daytime use, while a night cap was usually called a "night cap". One blogger said sleeping caps from that era were almost indistinguishable from bonnets, which is why I believe you can use the sleeping cap pattern for a quick and easy bonnet.

You can view my halloween costume Pinterest board here, complete with links to blog postings, historical examples and inspirations.

This month I will be posting tutorials for:
- original mid-1800's night cap / bonnet
- hospital restraints / manacles
- bloody knife.

Happy crafting!

Tuesday, October 27, 2015

How to make a Victorian era night cap


Above is a side-by-side comparison of the original Peterson's Magazine July 1859 night cap illustration and my completed bonnet.

One historical re-enactor said that night caps from this era were often indistinguishable from bonnets. If you like the look of this night cap, it would make an easy and quick adult women's bonnet as well. (Costumes are supposed to be fun, not perfectly historically accurate.) 

Free downloadable night cap pattern:


Sewing instructions: 
This is a rough diagram of how the bonnet will be constructed. You can click on any picture to view it in greater detail. Both of the curved sides (highlighted in blue) will be gathered prior to sewing the crown seams. The side flap of the brim (highlighted in green) will then be sewn to the gathered crown.


Step 1: Print out the pattern in tile. Print actual size, not “fit to page”. Tape together.

Step 2: Cut out the pattern and trace onto the wrong side of your fabric.

Pro tip: I found out that pencil can stain light fabrics and does not fully wash out. However, erasing the marks lightly with a white artists eraser before laundering helps considerably. It helps as well if you rub the graphite marks with a stain remover stick and then wash the garment in cold water. 

Step 3: Add a half-inch seam allowance to most hems and a one-inch seam allowance for the drawstring at the nape of the neck.


Step 4: Cut out the bonnet, following the seam allowance markings.


Step 5: Zigzag the side flaps, curved sides and bottom of bonnet. These seams will not be double fold hems, so this is to prevent fraying. 

Draw a button hole in the centre of where the back drawstring will be. This is roughly 4 inches from the curved edge and ¼ inch above the hemline. Follow your sewing machine's user manual to create a one-inch long button hole. Snip open. 

At the end of step five, this is what it should look like with zigzag seam allowances and completed button hole:

Step 6: Run a loose basting stitch just outside of the marked curved edges' hem line and gather both sides. Once gathered, the seam should measure the same length as the side flap that it will be joined to. Distribute the ruffles evenly.

Pin the side brim flap to the curved crown seam, right sides together.

Repeat for both sides. Sew using a nice tight straight stitch along the marked hemline of the brim. 

Once the crown is complete, it will look like this. It's starting to resemble a cap!

Step 7: The back drawstring is what gives this cap its shape and ensures it fits securely on the head. Fold the seam over once on the one-inch hemline, wrong sides together. You can fold it over twice, but ensure that there is enough space for your drawstring to fit comfortably. Sew as close as possible to the raw edge to form a channel, but leave the side edges open.  

Cut two pieces of flat cording for the drawstring. I had canvas drawstring from a second hand shop that I used, but ribbon, bias tape or seam edging would work as well. Pin a safety pin to one edge of the drawstring and pull it through the channel from the far edge out through the button hole. Repeat.

Pull both pieces of cording through the button hole, leaving only half an inch poking out from the sides. Secure the cording and outside edge of the drawstring channel by sewing along the red line indicated below. Repeat for the other side. This closes the drawstring channel and ensures the cording doesn't get pulled out when tying a bow. Trim the excess drawstring at the sides. 
Tie a tight bow at the back, gathering the fabric to fit your head. 

Step 8: Double fold the remaining edges of the front brim and sew. That's it, you're done!

Painting a foam mannequin head

I've been sewing bonnets for my Halloween costume (more on that to come) and I wanted to paint a mannequin head to stage the hats on. It is hard to take a nice photo of the back of one's head.


Michael's had foam mannequins 50% off for approx. $5. Why not?

Turns out foam is a b**** to paint. JoAnn's had some handy tips, as did ThriftyFun. I decided to try ThriftyFun's advice.

Step 1: I applied two coats of ModPodge to seal the foam and lessen the amount of acrylic paint it would absorb. I dabbed on thin layers of ModPodge using a sponge brush to get in all the cracks and smoothed out the surface with long strokes.


Step 2: In an attempt to create a smoother surface with tooth for the acrylic paint to adhere to, I applied two layers of white acrylic gesso (inert primer).

Step 3: There were the odd protruding foam granules that looked a tad unsightly. I tried cutting them off with an Exacto knife, but the foam began to rip and pull away in large chunks. I used a fine grit sand paper to wear the bumps down. Once you sand through the gesso and ModPodge, the sand paper doesn't have anything to grip to. I could not get the bumps completely flat, but it was enough.


Step 4: I used cheap beige acrylic paint from the dollar store. It took three coats to achieve an opaque skin tone.

Step 5: Using a fine brush, I free-handed painting the eyelids, eyebrows and lips on.

Step 6: I sealed everything with two coats of acrylic spray sealer. This is an important step, to prevent the paint and gesso from separating from the ModPodge layer.

Pro tip: When you hold the foam head between coats of ModPodge/gesso/acrylic paint, ensure that your hands are completely dry. If your fingers are wet or tacky, the gesso/acrylic paint will stick to your hands and peel off the mannequin head like fake gummy latex skin. That's the only way I can describe it.

Pro tip: Remember that the foam heads are tilted, so center your lips with the middle of the nose. My lips are crooked, because I aligned them as if the head was vertical.

Saturday, October 10, 2015

DIY bobbypin holder from a dental floss container

My bobbypins are breeding. That's they only reasonable answer. They fall out of every pocket. They have established various colonies on my desk and in my bathroom and in my car. I wouldn't be surprised if I found one baked into my dinner.

I decided to make a bobbypin holder. The most popular option appears to use a recycled tictac container. The only thing I had was a large floss container there the floss kept falling out. I thought this was an original idea, but I found someone else who has done it before. However, I am fairly certain no one else has a zebra-print recycled floss bobbypin holder. So I present to you the step-by-step guide for creating your own.

Materials:
- Floss container
- White spray primer that will adhere to plastic
- Fabric
- Brush
- Mod Podge
- Scissors
- Acrylic paint
- Acrylic sealant

Step one: Find yourself a large plastic floss container, pull out the central plastic insert and give it a quick wash.


Step 2: I probably didn't have to do this, but I wasn't sure how sheer the fabric would be. So I gave the plastic a quick sand with the finest grain of sandpaper I had to help the primer adhere better. I applied 2 coats of white spray primer to cover the label on the floss container. It also ensured the acrylic paint adhered to the lid.


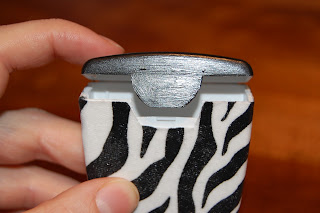
Step 3: I decided to use a cotton zebra print. I cut out a rectangle large enough to wrap around the floss container and then added an inch or two on all sides for safety. Going side by side, I applied a generous layer of Mod Podge on the floss container and pressed on the fabric, ensuring no air bubbles. I overlapped the fabric by a few millimeters on one corner, trimmed the excess length and made sure it was glued down securely.


Step 4: Once the fabric was glued onto the floss container, I trimmed the fabric right down to the lip of the top. I left a 1/4 inch or so on the base to fold under later.

Pro tip: The container wasn't clicking shut, so I had to go back and snip away the fabric that was getting caught between the tab and the locking mechanism. I would recommend cutting this fabric away before gluing this section down.


Step 5: I sealed the fabric with a thick layer of Mod Podge applied over top, ensuring I worked the Mod Podge deep into the fibers of the material. I folded the excess fabric under the base of the floss container, tucking the corners under like I was folding a present. I glued that down with Mod Podge as well.

Step 6: The curve top seemed like too much hassle to try and cover with fabric so I gave that two coats of black acrylic paint.

Step 7: Mod Podge dries extremely tacky (which in a bathroom can be bad news. Hair and lint will stick to your bobbypin holder). I sprayed all sides with a matte acrylic sealant.

Step 8: I cut a small rectangle of black felt and glued it on the bottom so the floss container would not slide about the counter or wobble over.

Now corral your bobbypins and enjoy being a DIY organizational goddess!