My bobbypins are breeding. That's they only reasonable answer. They fall out of every pocket. They have established various colonies on my desk and in my bathroom and in my car. I wouldn't be surprised if I found one baked into my dinner.
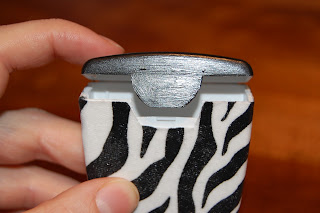
I decided to make a bobbypin holder. The most popular option appears to use a recycled tictac container. The only thing I had was a large floss container there the floss kept falling out. I thought this was an original idea, but I found someone else who has done it before. However, I am fairly certain no one else has a zebra-print recycled floss bobbypin holder. So I present to you the step-by-step guide for creating your own.
Materials:
- Floss container
- White spray primer that will adhere to plastic
- Fabric
- Brush
- Mod Podge
- Scissors
- Acrylic paint
- Acrylic sealant
Step one: Find yourself a large plastic floss container, pull out the central plastic insert and give it a quick wash.
Step 2: I probably didn't have to do this, but I wasn't sure how sheer the fabric would be. So I gave the plastic a quick sand with the finest grain of sandpaper I had to help the primer adhere better. I applied 2 coats of white spray primer to cover the label on the floss container. It also ensured the acrylic paint adhered to the lid.
Step 3: I decided to use a cotton zebra print. I cut out a rectangle large enough to wrap around the floss container and then added an inch or two on all sides for safety. Going side by side, I applied a generous layer of Mod Podge on the floss container and pressed on the fabric, ensuring no air bubbles. I overlapped the fabric by a few millimeters on one corner, trimmed the excess length and made sure it was glued down securely.
Step 4: Once the fabric was glued onto the floss container, I trimmed the fabric right down to the lip of the top. I left a 1/4 inch or so on the base to fold under later.
Pro tip: The container wasn't clicking shut, so I had to go back and snip away the fabric that was getting caught between the tab and the locking mechanism. I would recommend cutting this fabric away before gluing this section down.
Step 5: I sealed the fabric with a thick layer of Mod Podge applied over top, ensuring I worked the Mod Podge deep into the fibers of the material. I folded the excess fabric under the base of the floss container, tucking the corners under like I was folding a present. I glued that down with Mod Podge as well.
Step 6: The curve top seemed like too much hassle to try and cover with fabric so I gave that two coats of black acrylic paint.
Step 7: Mod Podge dries extremely tacky (which in a bathroom can be bad news. Hair and lint will stick to your bobbypin holder). I sprayed all sides with a matte acrylic sealant.
Step 8: I cut a small rectangle of black felt and glued it on the bottom so the floss container would not slide about the counter or wobble over.
Now corral your bobbypins and enjoy being a DIY organizational goddess!


No comments:
Post a Comment