Search Fancy-free Crafts Blog

Monday, May 18, 2015

Quilted stuffed zebra

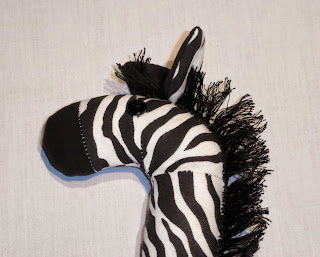
I picked up a 1980's sewing book (now out of print) at the second hand store that contained a plethora of cute children's toy patterns. The first one I tackled was this quilted toy zebra.

Finished quilted zebra
Overall, the pattern was straightforward. The one flaw was that the book did not say to attach the pieces in the reverse order for the other side. I was trying to sew together two right-sided zebras before I realized I had to redo the body for a third time.

I thought this might be an item I could sell on Etsy, but it took a very long time to complete. Each quilted square has the stripes running in a different direction (vertical, horizontal, on the bias). The mane and tail are also hand sewn using embroidery thread. That was the real time suck!

Also, this is not a toy for small children, especially with the button eyes and mane/tail that can be easily pulled out. The instructions said to loop the mane, no knots. I added some glue onto the loops to secure them afterwards. If you love him as much as I do, I have this adorable fellow available (one time only) on Etsy.

Close up of stuffed zebra ears and head. 

Part 1: refurbishing a kiddie chair

This sad and lonely child's Ikea chair was left out on the curb - with a giant whole through the seat. I couldn't let it go to waste; even though I have no use for it. I rationalized this pickup by telling myself I've never tried to re-do furniture before and it wouldn't matter if I messed it up. Also, Ikea furniture comes apart easily.

Indeed, the chair was easy to take apart. The seat was made of some kind of press-board, so I had to find a way to replace it using a different material and without power tools. The solution appears to be fabric seat weaving!

But first I have to give the wood a refresh. I washed it thoroughly and gave one side a preliminary coat of white gloss outdoor paint.

A youngster had drawn a few vibrant red squiggles in marker on the legs. Since it had not washed off, I assumed it was old and dried. Not so. The marker bled through the white paint. I am currently sanding the paint off and priming the leg to see if I can prevent the marker from bleeding through a second time. The adventure continues in part two.


Making a furoshiki wrapping cloth

My completed furoshiki-wrapped test gift!

I used to think wrapping paper was a necessary evil. Then I stumbled across an old craft book at the library featuring a pattern for a quilted Christmas "furoshiki" or Japanese wrapping cloth. After this year's horrible experience with wrapping gifts for the new extended family I thought this furo-whatever thing may warrant a closer investigation.

My holiday wrapping nightmare: after spending more than $25 on what I thought were 2 rolls of quality giftwrap from Target, I spent an entire evening wrapping presents. That's several hours of my life wrapping presents and I don't even have children yet. The wrapping paper was so thin it kept ripping at the seams. And after the Christmas gift exchange was over, there were 2 large garbage bags full of waste. It just didn't seem right.

It turns out a furoshiki is simply a large square of cotton or synthetic fabric used to wrap a gift or carry an object - no quilting or double-siding necessary (whew). In fact, it's a whole system over a thousand years old, with many traditional ways to tie and wrap odd sized objects. Perfect! Not only is it the ultimate form of re-usable, economic gift wrap, but you can quickly follow instructions to attractively wrap any object. No more fumbling with tape, scissors and weird shaped gifts.

Mitered corners.
The four key considerations to sewing your wrapping cloth are size, fabric weight, design and seam method. A beveled or mitered corner looks best, here is the a great tutorial that I followed. I picked up two lightweight cotton prints at the thrift store to try. The first furoshiki came out too small (about 15 inches by 15 inches) and the largest things I can wrap are small rectangular objects. And the knots are too tiny.

I tried the book-carry wrap, it's super fast and looks very cheerful with the bright print. My only suggestion would be to reinforce the corners as they absorb most of the stress of the knots. I can see them stretching and twisting already.

I'll update when I complete some larger ones and some Christmas ones! I'm also wondering what would happen if they were made in a diamond shape instead of a square?